Sampling Distributed Traces Without Losing the Signal

Table of Contents
Distributed tracing gives you the story of a request across services. It also gives you a bill that can spiral fast. At scale, the default “trace everything” posture collapses under its own weight: cost, query latency, and a sea of identical traces that bury what you actually need.
Here’s the hook I use with teams: imagine 10,000 requests per second, 20 spans per trace, 1KB per span. That’s roughly 500TB per month. Even at a modest ingest price like $0.30 per GB, you’re staring at a six-figure bill for mostly routine traffic. Sampling is the lever that turns tracing from a cost center into a signal engine.
Sampling is not a cost trick. It is a signal strategy: keep the traces that teach you something, drop the ones that do not.
This short article keeps only the pieces that carry the most weight:
- How head and tail sampling trade cost, complexity, and outcome capture —
- How to pick a strategy at your traffic level and debug when traces go missing —
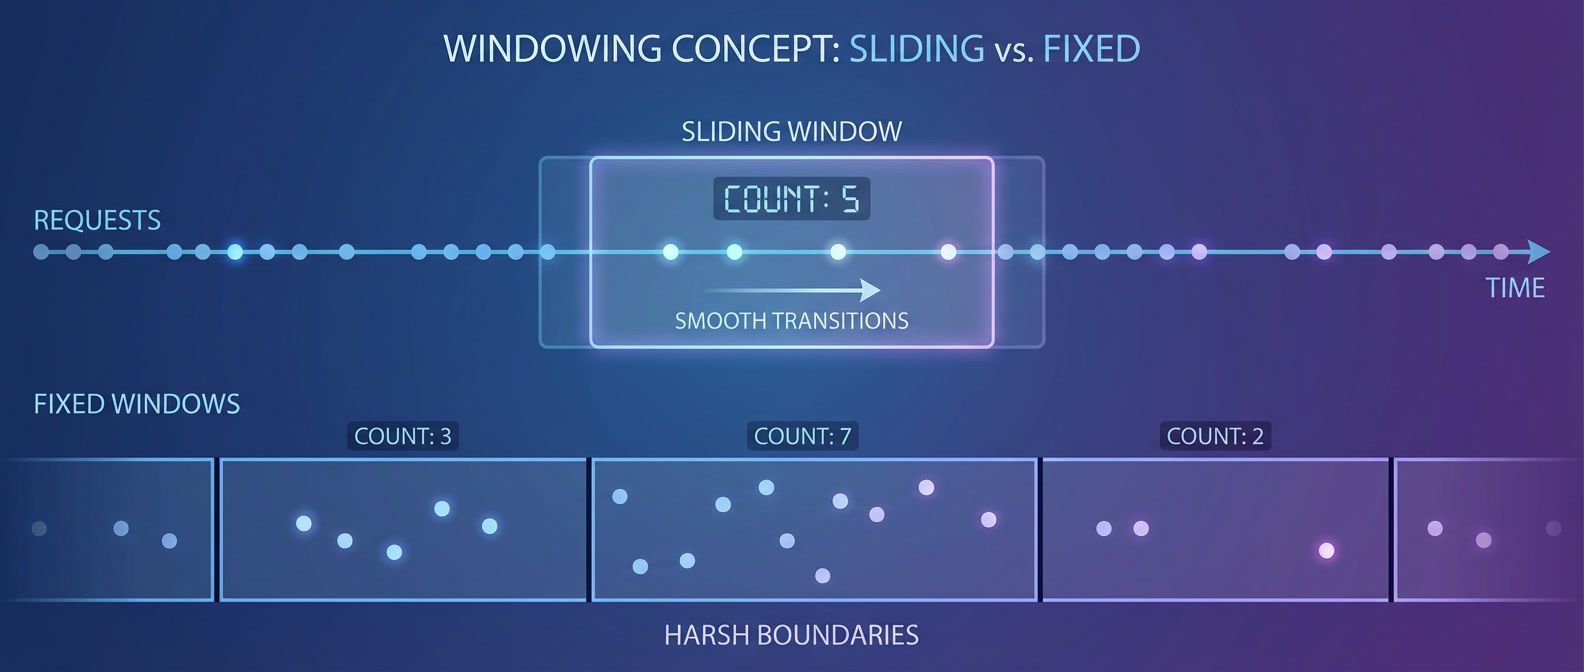
Head sampling: fast, cheap, and predictable
Head sampling makes the decision at the start of a trace. The first service picks a keep or drop decision and that choice propagates downstream through the trace context headers, so every downstream service honors the same decision. You get three benefits immediately:
- Cost control is straightforward:
- Sample 10% and your ingest costs drop roughly 90%.
- The infrastructure is simple:
- The logic lives in the SDK you already run.
- Traces show up quickly:
- There is no buffering or delayed decision.
The trade‑off is that you are guessing at the beginning of a request. You cannot know whether that request will error or become slow later. That means head sampling is great at cost control, but weak at guaranteeing outcome‑based capture.
In practice, head sampling works well when error rates are high enough that a statistical sample still captures meaningful failures, or when your team values simplicity over perfect coverage. It is the right default for most teams starting out.
Tail sampling: outcome‑aware, but operationally heavier
Tail sampling flips the decision point to the end of the trace. Spans are buffered until a trace completes, then evaluated against policies like “keep all errors” or “keep traces above 2 seconds.” This approach gives you powerful guarantees:
- You can capture every error trace.
- You can keep all slow traces tied to an SLO breach.
- You can filter by business events and keep only the valuable transactions.
The cost is operational complexity. Tail sampling requires a stateful collector tier, buffer memory, and trace‑ID routing so that all spans for the same trace arrive at the same collector. It also adds delay: the traces you want are visible only after the decision wait window expires.
If you can absorb the complexity, tail sampling gives you the highest signal density. But it should be a deliberate choice, not a default. A typical policy set looks like: keep all errors and keep traces above 2 seconds.
Tail sampling is powerful, but it is stateful. If you cannot operate a collector tier with buffering, backpressure, and trace-ID routing, head sampling is the safer default.
Choosing the right strategy at your scale
The decision is less about ideology and more about constraints. A quick framing I use:
- Under 1,000 RPS: Do not over-optimize. Use head sampling or even full capture in limited windows.
- 1,000 to 10,000 RPS: Head sampling is usually enough, unless you must guarantee error capture.
- Over 10,000 RPS: Head sampling for baseline cost control, tail sampling only if you can run it well.
If you are in the 1,000 to 10,000 RPS band, a common starting point is 5% to 10% head sampling and adjusting based on error visibility.
If you need both cost control and guaranteed capture, a hybrid approach is the usual landing spot:
- Use head sampling to reduce volume to a manageable fraction.
- Apply tail sampling to that fraction to keep the truly interesting traces.
You get deterministic error capture without paying the full cost of tail sampling on 100% of traffic.
Debugging when traces go missing
Sampling changes how you debug. The trace you want might not exist. That is normal, so your debugging workflow needs a fallback path.
Here is the workflow I recommend in teams that sample aggressively:
-
Always log trace IDs for every request, sampled or not.
-
Correlate logs, metrics, and traces. Metrics with exemplars can point to traces that were sampled.
-
Use on-demand sampling for reproducible issues so you can force a trace when it matters. A simple header like `X-Force-Trace: true` is often enough.
The key mindset shift is this: tracing is one signal, not the only signal. If your logging and metrics are structured for correlation, you can still debug effectively even when a specific trace is missing.
If you can find the trace in logs and metrics, you can still debug the incident. Sampling changes your workflow, not your ability to resolve issues.
The short version
Sampling is not about throwing data away. It is about selecting the right data so you can act on it. Start with head sampling because it is simple and predictable. Move to tail sampling when you need outcome‑based guarantees and have the operational headroom. If you need both, use a hybrid approach.
Download the Tracing Sampling Guide
Get the complete sampling playbook for cost control, error capture, and practical trace-debug workflows at scale.
What you'll get:
- Head sampler configuration guide
- Tail policy tuning matrix
- Hybrid rollout decision framework
- Missing trace debugging runbook

The end goal is not 100% trace coverage. It is reliable insight at a cost you can sustain. Aim for enough traces to answer real questions, not every trace you can store.
Share this article
Enjoyed the read? Share it with your network.