Your Rate Limiter Is Your Biggest Outage Risk
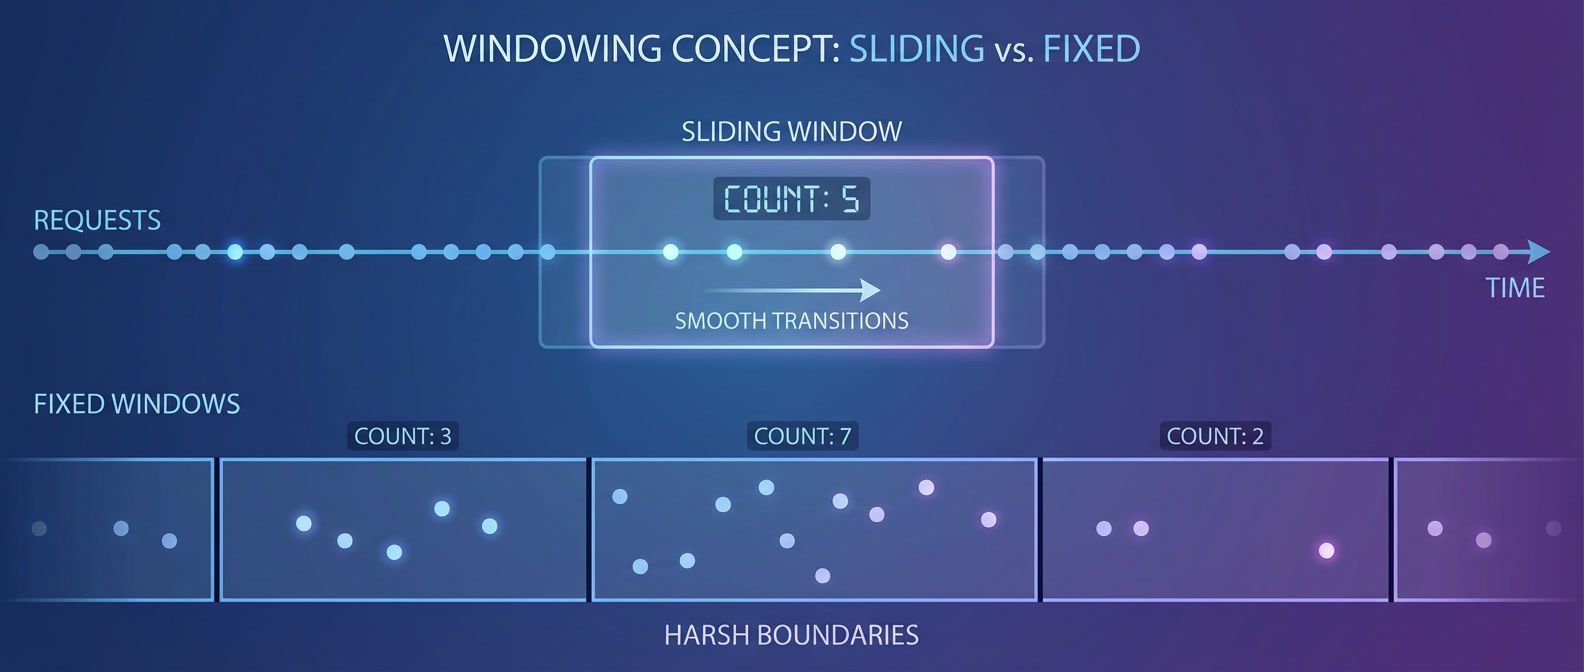
Table of Contents
Rate limiting is a double-edged sword. Done right, it protects your systems from overload and abuse. Done wrong, it becomes a self-inflicted outage — your own infrastructure rejecting legitimate users during the moments you need capacity most.
I watched this play out at a company that implemented per-IP rate limiting at 100 requests per minute to prevent scraping. Seemed reasonable. Then a customer behind corporate NAT reported they couldn’t use the service. Five hundred employees sharing one public IP meant each person got 0.2 requests per minute. They switched to API key-based limiting with per-key quotas. Problem solved — until a viral moment hit and legitimate traffic spiked 10x. Their fixed-window rate limiting rejected 90% of requests at minute boundaries. Users hammering refresh made it worse.
The fix? They combined sliding window counter (to eliminate the boundary problem) with token bucket for burst control. Same traffic spike: requests distributed smoothly, everyone got served, the backend hummed along at capacity without falling over.
The naive approach — “block anything over N requests” — fails because it treats rate limiting as a wall instead of a valve. The algorithms matter, but where you limit and how you identify clients matter more.
Where to Rate Limit
Most rate limiting articles jump straight to algorithms. But the strategic question — where in your stack to enforce limits — often matters more than which algorithm you choose.
| # | Layer | Tools | Granularity | Best For |
|---|---|---|---|---|
| 1 | Edge/CDN | Cloudflare, CloudFront, Fastly | IP, geography | DDoS, bot protection |
| 2 | API Gateway | AWS API Gateway, Kong, nginx | API key, route | API quotas, tiered plans |
| 3 | Application | Custom middleware | User, action, context | Fine-grained business logic |
| 4 | Service Mesh | Istio, Envoy, Linkerd | Service identity | Service-to-service limits |
- 1 Edge rate limitingStops bad traffic before it reaches your infrastructure. Cloudflare, Amazon CloudFront, and similar CDNs can reject requests milliseconds from the client, before your servers even see them. But edge limiting is coarse-grained — typically by IP or region. It's your first line of defense against volumetric attacks, not your primary quota enforcement.
- 2 API gateway limitingWhere most teams should implement their primary rate limits. AWS API Gateway, Kong, and nginx all support token bucket or similar algorithms out of the box. Gateway-level limiting handles per-API-key quotas, tiered rate limits, and route-specific throttling without touching application code.
- 3 Application-level limitingGives you the finest control — you can limit by user, by action, by context, or any combination. But it comes with complexity: you're responsible for state management (usually Redis), failure handling, and the actual algorithm implementation. Use it when gateway-level limits aren't granular enough: per-user action limits, variable-cost operations, or business-logic-driven throttling.
Don’t implement rate limiting only at the application layer. By the time requests reach your app, they’ve already consumed network bandwidth, TLS handshakes, and load balancer capacity. Use defense in depth: coarse limits at the edge, refined limits at the gateway, fine-grained limits in the app.
Token Bucket: The Algorithm You Need to Know
Token bucket is the workhorse of API rate limiting. Most production rate limiters — including the gateway tools mentioned above — use it because it elegantly handles the tension between burst tolerance and sustained rate enforcement.
The mental model: imagine a bucket that holds N tokens (your burst capacity). Tokens are added at rate R (your sustained RPS). Each request consumes a token if available; otherwise it’s rejected. This naturally allows bursts — a client can use their full bucket immediately — while maintaining a sustained rate over time.
# Token bucket pseudocode
def check_request(bucket, cost):
    elapsed = now() - bucket.last_update
    bucket.tokens = min(bucket.tokens + elapsed * refill_rate, capacity)
    bucket.last_update = now()

    if bucket.tokens >= cost:
        bucket.tokens -= cost
        return "ALLOW"
    else:
        retry_after = (cost - bucket.tokens) / refill_rate
return ("REJECT", retry_after)Here’s how traffic patterns play out with a 10-token bucket refilling at 1 token per second:
| Traffic Pattern | What Happens |
|---|---|
| Steady 1 RPS | Every request allowed — token regenerates before next |
| Burst of 10 | All 10 served instantly, then 1 RPS until refilled |
| Sustained 2 RPS | 10 initial + 5 refilled over 10s = 15 of 20 allowed; then 50% rejected |
| Variable cost (GET=1, POST=5) | Heavy operations consume quota faster |
The key insight: token bucket allows bursts (good for user experience) while maintaining a sustained rate that protects your backend. Compare this to leaky bucket, which queues requests up to capacity and serves them at a constant rate — rejecting new arrivals when the queue is full. Leaky bucket produces perfectly smooth output but adds latency as requests wait in the queue. Use it when you need constant output rate to a downstream service that can’t handle any bursts, like a payment processor with strict per-second limits.
For distributed systems, you need atomic operations. The standard pattern is a Redis Lua script that reads state, calculates refill, checks tokens, and updates — all in one atomic operation. Without atomicity, concurrent requests can race past your limits.
The Client Identification Trap
The rate limiting key — how you identify who’s making requests — is as important as the algorithm. Choose wrong, and you’ll either punish legitimate users or fail to stop abuse.
- IP address Seems obvious but has a fatal flaw: corporate NAT. Hundreds of employees behind a single public IP will exhaust per-IP quotas almost instantly. IP-based limiting works for anonymous endpoints and anti-bot protection, but it punishes shared networks.
Header spoofing is trivial: curl -H "X-Forwarded-For: 1.2.3.4" your-api.com. If your rate limiter trusts that header without validation, attackers can rotate through fake IPs indefinitely. Always validate that requests actually came through your proxy before trusting forwarded headers.
- API key The standard for B2B APIs. Per-customer limits, usage tracking, revocation — all straightforward. The risk: customers distributing keys to multiple applications, or keys getting stolen and abused.
- User ID Gives you true per-user limits that work across IPs and devices. The tradeoff is authentication overhead and the fact that it doesn't help with anonymous endpoints.
- Composite keys (user + action, IP + endpoint) Give you fine-grained control at the cost of complexity. Useful when different operations need different limits.
Production systems often combine multiple strategies: global IP limits as a DDoS backstop, API key limits for quota enforcement, and user + action limits for abuse prevention. All must pass for a request to proceed.
Rate Limiting Done Right: Protecting Users From Yourself
How to implement rate limits that prevent abuse without accidentally blocking legitimate traffic during spikes.
What you'll get:
- Algorithm selection decision tree
- Redis limiter implementation patterns
- Rate-limit header response guide
- Traffic spike test scenarios

Key Takeaways
Rate limiting is a valve, not a wall. The best rate limiters are invisible to normal users — they only activate during abuse or overload.
Three takeaways:
- Layer appropriately
- Edge for DDoS, gateway for API quotas, application for business logic
- Use token bucket for APIs
- It allows bursts (good UX) while enforcing sustained rates (protects backend)
- Identify clients carefully
- IP addresses lie, corporate NAT punishes legitimate users, and composite keys add complexity
The goal isn’t to reject requests — it’s to shape traffic so rejection becomes rare. Design for legitimate bursts, communicate limits clearly through response headers, and monitor rejection rates. Rate limiting done right protects your service without punishing your users.
Share this article
Enjoyed the read? Share it with your network.